
Are you interested in learning how to change WordPress’s link color?
You can modify the color of your link to have greater control over the design of your website. This will make it easier and more intuitive for your visitors.
Also See: Guidelines & Best Practices for Exceptional Web Design
This article will demonstrate step-by step how to change WordPress link colors.
How to change the color of a link in WordPress (beginner’s Guide)
Why is it important to change the link colour in WordPress
WordPress will automatically set the link’s color when you add a new link.
Sometimes, the default color options of your WordPress theme will be exactly what it says. Other times you’ll need more control over the look and feel of your links.
Perhaps you want to make your links more consistent with your business’s brand and logo. You may also wish to increase the color contrast to make web access easier for people with limited vision.
Some themes let you change the link colour directly from your theme options panel.
Let’s talk about a few options for changing the link color on WordPress.
Method 1. Change Link Color in WordPress by Editing CSS
The custom CSS code can be used to modify the link colors in WordPress.
The first thing you should do is go to your WordPress admin dashboard. Click Appearance >> Customize then click the Additional CSS’ menu option.
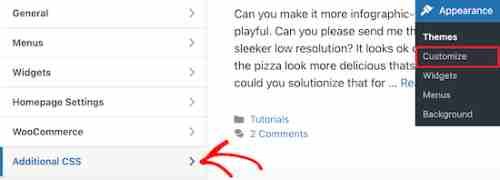
WordPress customizer allows you to add CSS
This will bring up a screen on which you can enter your CSS code.
These CSS code snippets will be added to the editor’s section.
Screen add additional CSS code
First, we will customize the overall link colour. This is what your visitors will see when they click the link for the first time.
For an example, see the CSS code below.
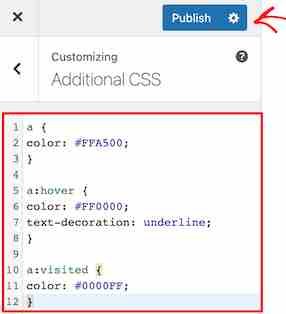
a { color: #FFA500;}
This will change link color to orange. You must change the #FFA500 colour to the one you choose.
WordPress allows you change the color of your link hover.
The link hover color is our next change. When a user hovers their mouse over a link, it changes color to attract their attention.
For an example, see the CSS code below.
a:hover { color: #FF0000; text-decoration: underline;}
The code above will change link color to red and highlight text when visitors hover on it. Make sure you change the #FF0000 to the color that you prefer.
WPBeginner uses a link underline hover effect on all of our links.
WordPress allows you to change link colors after visiting.
A link’s color can be modified after users click on it. This will make it easier for visitors to navigate your WordPress site and allow them to see the links that they’ve clicked.
To change the link color, use the CSS code.
a:visited { color: #0000FF;}
You must change the blue #0000FF colour to the color you choose.
The WordPress customizer will display all the CSS codes above.
WordPress customizer code
Once you’re done making your changes, click the “Publish” button.
The CSS code below will change all links on your site’s color.
Use the code sample below to modify only the links in your pages or posts.
.entry-content a { color: #FFA500;} .entry-content a:hover { color: #FF0000; text-decoration: underline;} .entry-content a:visited { color: #0000FF;} |
This code is identical to the code samples but only targets hyperlinks within your content.
WordPress: Change the color of your navigation link colors
Another link style that you can also customize are your navigation menu hyperlinks.
Customize navigation menu links
Our guide on how to design WordPress navigation menus provides more information.
If you don’t want code added directly to your WordPress theme you can use a CSS plug-in to add code.
So, even if you choose to change the theme of WordPress, your CSS modifications will still be effective.
First, you will need to install the Simple Custom CSS or JS plugin. See our step-by–step guide on how to set up a WordPress plugin.
After activation, go to Custom HTML & JS >> Insert Custom CSS in your WordPress administration panel.
Here, you can use the same CSS code that was used above.
Use plugin to create custom CSS codes
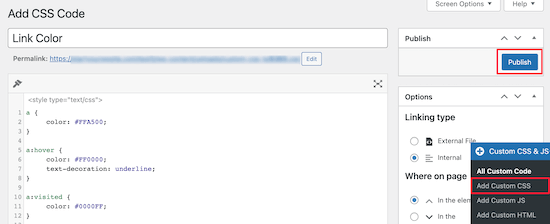
Once you’re done with adding the code click on the ‘Publish’/’Update’ button.
Method 2. Change the Link Color Without Editing CSS
This method is best for people who don’t know how to edit CSS files.
A CSS styling plugin allows you to visually edit the site without needing to add CSS code.
The CSS Hero plugin is highly recommended. It is extremely user-friendly and allows for visual customization of your website, similar to a drag-and drop page builder.
Once you have installed the plugin, you must click the Proceed to Product Activation button above the list of plugins. You will then need to connect your account and activate the plugin.
Activate CSS Hero
This will take to you to a screen in which you can enter username and password.
After your account verification is complete, all you need to do is to follow the instructions on-screen.
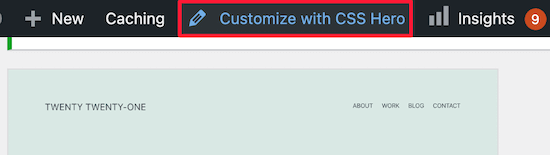
Next, click “Customize using CSS Hero” at the top of the WordPress admin toolbar.
CSS Hero allows you create custom CSS designs

The CSS Hero will now open your website. CSS Hero uses an editor called “What You See is what you get (WYSIWYG).
Click on any element to bring up the toolbar. Here you can make customizations.
Next, click one of the links to your site. Start with the blog post link.
Click on this link
You can then choose a new link color by selecting the Typography’ menu option.
You have the option to choose a different color from the available colors, or you can create your own code.
Select typography option
Change the color of your WordPress Navigation Menu
Next, you have the option to change the color scheme of your WordPress navigation menu links.

Simply hover your mouse over the navigation menu to click on one of its menu items.
Click on the navigation menu link
You can then customize the color by selecting the Typography option.
You’ll see that the changes made to the menu link colors are immediately visible in the preview.
Customize menu color CSS Hero
Once you are done changing the colors of the links, click on the ‘Save and publish’ button to bring your changes to life.
This article will help you change the link color in WordPress. Also, check out our guide to choosing the best web designing software and our list if must-have WordPress plugins.